
The Procurement Nightmare Every Engineer Knows
Quick Reference — USB-C Pin Count Comparison:
- 24-pin: Full USB4 (40 Gbps) + DisplayPort Alt Mode + 240W USB PD
- 16-pin: USB 2.0 + 100W USB PD charging only
- 12-pin: USB 2.0 + 100W USB PD, simpler PCB routing than 16-pin
- 6-pin: Charging only (VBUS, GND, CC1, CC2, D+, D−), no data
Vistar Electronics manufactures 6-pin, 16-pin, and 24-pin USB-C receptacles in SMT, mid-mount, DIP, and waterproof configurations. View all USB-C connectors → | Request free sample
USB-C Connector Pinout Explained: Complete 24-Pin, 16-Pin, 12-Pin & 6-Pin Guide for Engineers (2026)
You have spent three weeks finalizing a board design. The BOM is locked, the PCB is routed, and the prototype is on the fabrication line. Then the email arrives from your purchasing team: the 24-pin USB-C receptacle you specified is back-ordered for sixteen weeks. The alternative? A 16-pin variant that costs 40% less and ships tomorrow.
The question hits hard: will dropping eight pins break your product?
This scenario plays out weekly in procurement departments and engineering labs across the industry. USB-C is not one connector. It is a family of pin configurations—24P, 16P, 12P, and 6P—each with radically different capabilities, cost structures, and design implications. Misunderstanding the pinout is not a minor oversight. It is a product-killer.
This guide breaks down every pin, every configuration, and every trap that catches even seasoned engineers. No fluff. Just the technical depth you need to spec the right connector the first time.
USB-C 24-Pin Pinout Diagram: The Full-Featured Reference
Before diving into function groups, here is the complete pin assignment for the standard 24-pin USB-C receptacle. Bookmark this table. You will return to it often.
Receptacle Pin Assignment (Front View)
| Pin | Signal | Pin | Signal |
|---|---|---|---|
| A1 | GND | B12 | GND |
| A2 | TX1+ | B11 | RX1+ |
| A3 | TX1− | B10 | RX1− |
| A4 | VBUS | B9 | VBUS |
| A5 | CC1 | B8 | SBU2 |
| A6 | D+ | B7 | D− |
| A7 | D− | B6 | D+ |
| A8 | SBU1 | B5 | CC2 |
| A9 | VBUS | B4 | VBUS |
| A10 | RX2− | B3 | TX2− |
| A11 | RX2+ | B2 | TX2+ |
| A12 | GND | B1 | GND |
Critical symmetry note: The A and B rows are not simple mirror images. They are symmetric about the central origin point. When a plug is inserted upright, A5 (CC1) connects to the cable’s CC line. When flipped, B5 (CC2) takes over. This origin-symmetric layout is what makes reversible insertion possible without mechanical switches inside the connector.
For the plug side, the pinout differs slightly: only one CC pin is wired through the cable (the other becomes VCONN to power active cable electronics), and the D+/D− pins are internally shorted to a single pair. If you are designing a captive cable or dongle, consult the USB Type-C Specification R2.0 directly—mistakes here trigger debug accessory mode instead of normal device enumeration.
USB-C Pin Functions Explained
Each pin group serves a distinct purpose. Understanding them individually prevents the most expensive design errors.
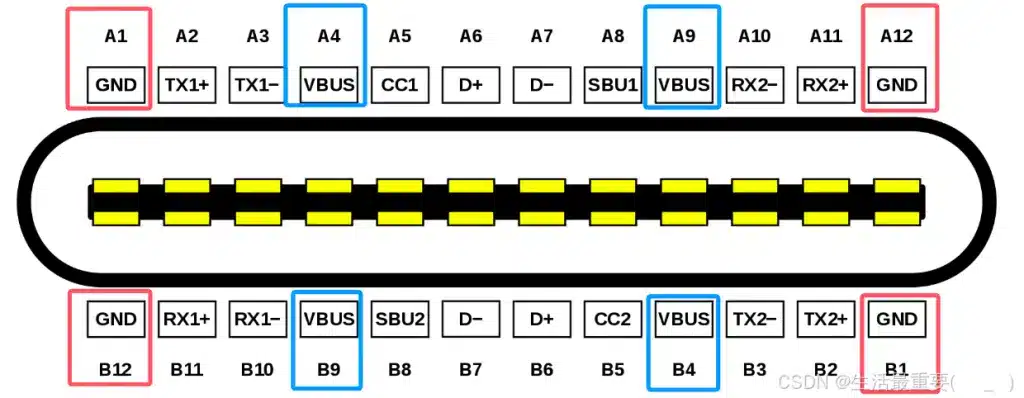
VBUS and GND: The Power Backbone
USB-C carries four VBUS pins (A4, A9, B4, B9) and four GND pins (A1, A12, B1, B12). This is not redundancy for redundancy’s sake. Running four pins in parallel slashes contact resistance and distributes thermal load. A single pin pair would melt under 5A sustained current. With four pairs, the connector safely handles up to 100W at 20V (and 240W at 48V under USB PD 3.1 Extended Power Range).
Default VBUS behavior: 5V present whenever a Source-to-Sink connection is confirmed via CC. Voltage negotiation happens later through the PD protocol. Never assume VBUS is “just 5V”—a poorly designed sink could see 20V before it is ready.
CC1 and CC2: The Brains of the Operation
If you remember nothing else from this guide, remember this: the CC pins are the most consequential pins in the entire connector. They perform four critical tasks simultaneously:
- Insertion orientation detection. The Source monitors both CC1 and CC2. Whichever pin sees the Rd pull-down (5.1 kΩ ±20%) from the Sink tells the Source which way the plug is facing.
- Connection detection and role definition. The Source detects attach by sensing the Rd termination. It then knows it is the power source (Source) and data host (DFP). The Sink, conversely, detects VBUS rising and knows it is the consumer.
- Current capability advertisement. Before any PD negotiation, the Source advertises its default current capability (500 mA, 1.5A, or 3A) via the Rp pull-up value on CC.
- USB PD protocol communication. All Power Delivery messages—voltage requests, power profiles, role swaps—travel as BMC-encoded signals (~300 kHz) over the active CC line.
Design trap: In a USB-C plug (not receptacle), one CC pin is repurposed as VCONN. If you place Rd pull-downs on both CC1 and CC2 inside a plug design, the host interprets your device as a debug accessory. Your product will not enumerate. One Rd. One pin. No exceptions.
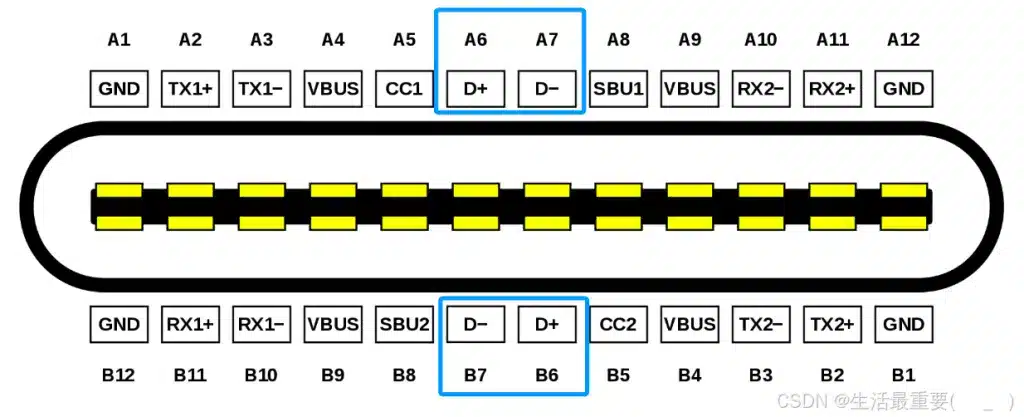
D+ and D−: The Legacy Lifeline
USB-C retains the classic USB 2.0 differential pair. On the receptacle, A6/A7 and B6/B7 are internally shorted, so the plug orientation does not matter. Data rate: 480 Mbps max. For devices that only need USB 2.0—keyboards, mice, basic chargers—this is the only data path you need.
Practical note: Do not route D+/D− as an afterthought. Even at 480 Mbps, poor impedance matching (target 90Ω differential) and stub length create eye diagram failures that are maddening to debug.
TX/RX Differential Pairs: The High-Speed Arteries
Four shielded differential pairs handle SuperSpeed data:
- TX1+/− (A2/A3) and RX1+/− (B11/B10)
- TX2+/− (B2/B3) and RX2+/− (A11/A10)
Two sets exist solely to support reversible plugging. In a single-lane USB 3.x implementation, only one TX/RX pair is active; the other sits idle. The CC-detected orientation tells the PHY which multiplexer path to enable.
In dual-lane mode (USB 3.2 Gen 2×2 or USB4), both pairs fire simultaneously, doubling bandwidth. This is also the physical foundation for Alternate Mode—DisplayPort, HDMI, or Thunderbolt signals can remap onto these same differential pairs, turning a USB-C port into a video output without adding pins.
Impedance target: 85–90Ω differential, tightly length-matched. Vias are the enemy here. Route these as microstrips or striplines with solid ground reference planes.
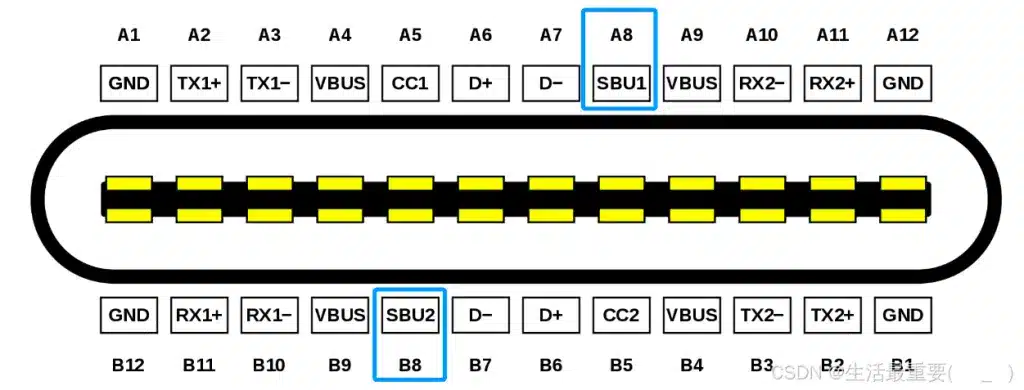
SBU1 and SBU2: The Sideband Specialists
These auxiliary pins (A8, B8) handle low-frequency sideband signals. In DisplayPort Alt Mode, SBU1/SBU2 carry the AUX channel for EDID communication and link training. In USB4, they become the sideband channel (SBTX/SBRX) for protocol management.
They are not high-speed data lines. Do not try to push USB 3.x traffic through them. But ignore them, and your DisplayPort Alt Mode implementation will fail silently. For the full bandwidth and resolution comparison between DisplayPort versions,
refer to our DisplayPort 1.4 vs 2.1 comparison.
VCONN: The Invisible Power Rail
VCONN is not a receptacle pin—it exists only in the plug, repurposed from the unused CC pin. It delivers 5V at up to 1W to power e-marker chips and active cable electronics. If you are sourcing cables for 5A/100W+ applications, verify they contain an e-marker. Passive cables cannot carry more than 3A regardless of what the connector suggests.
USB-C Connector Pinout Comparison: 24P vs 16P vs 12P vs 6P
Many low-cost USB-C connectors use a 16-pin design instead of the full 24-pin configuration. These connectors are suitable for charging and USB 2.0 communication but do not support high-speed USB 3.x or DisplayPort Alt Mode.
Here is where procurement and engineering collide. The pin count you choose locks in your product’s capabilities forever.
| Feature | 24-Pin Full-Featured | 16-Pin | 12-Pin | 6-Pin |
|---|---|---|---|---|
| USB 2.0 Data | Yes | Yes | Yes | No |
| USB 3.x / USB4 High-Speed Data | Yes (up to 40 Gbps) | No | No | No |
| USB PD Fast Charging | Yes (up to 240W EPR) | Yes (up to 100W) | Yes (up to 100W) | Yes (up to 100W) |
| DisplayPort / HDMI Alt Mode | Full support | Limited / No | Limited / No | No |
| Audio Adapter Mode | Yes | Yes | Yes | No |
| Typical Unit Cost | Highest | Moderate | Moderate | Lowest |
| PCB Complexity | High (impedance control required) | Low | Low | Minimal |
| Best For | Laptops, docks, smartphones, high-speed peripherals | Cost-sensitive USB 2.0 + PD devices | Same as 16P, simpler soldering | Pure charging, no data |
Vistar Electronics — USB-C Connector Manufacturer
Need the Right Pin Count for Your Design?
Vistar manufactures all four configurations — 24-pin, 16-pin, 12-pin, and 6-pin — in SMT, mid-mount, vertical, and waterproof variants. RoHS 3 compliant. MOQ 1,000 pcs. Free samples available.
24-Pin: The No-Compromise Option
Use this when your product needs high-speed data, video output, or future-proofing. The 24-pin receptacle is the only configuration that exposes all TX/RX pairs, enabling USB 3.2 Gen 2×2 (20 Gbps) or USB4 (40 Gbps). It is also mandatory for DisplayPort Alt Mode with full lane allocation.
When to avoid: If your MCU lacks a USB 3.x PHY, you are paying for pins you cannot use. The PCB routing complexity and connector cost are real penalties.
16-Pin and 12-Pin: The Sweet Spot for USB 2.0 + PD
Both configurations strip out the SuperSpeed differential pairs (TX/RX), leaving VBUS, GND, CC, D+/D−, and SBU. They support USB 2.0 data and full USB PD negotiation. The difference is purely mechanical:
- 16-pin: All 16 pads are exposed for soldering.
- 12-pin: VBUS and GND pins are internally combined, so only 12 solder joints are needed.
Functionally identical. Choose 12-pin if your assembly house prefers fewer solder points; choose 16-pin if you want the flexibility of individual power pin routing.
Real-world fit: Small appliances, IoT devices, printers, keyboards—anything that charges via PD but moves data at USB 2.0 speeds or lower.
For the full specifications of our 24-pin SMT mid-mount connector,
see the USB-TC24-F24 24-pin USB-C mid-mount receptacle.
6-Pin: Charging-Only Minimalism
The 6-pin variant retains only VBUS, GND, CC1, and CC2. No data. No SBU. Just power and the intelligence to negotiate it.
This is not a “dumb” connector. The CC pins still perform full PD negotiation, so a 6-pin port can deliver 100W with the right protocol chip. But it cannot transfer a single byte of data.
Real-world fit: Electric toothbrushes, desk lamps, toys, power tool chargers—any product where the USB-C port exists solely to accept power.
Read our detailed guide:
USB-C 24 Pin vs 16 Pin Connector
USB-C Pinout for USB PD: Power Negotiation Deep Dive
USB Power Delivery is where the CC pins earn their keep. The process is stateful, time-sensitive, and unforgiving of sloppy implementation.
The Attach Sequence
- Source monitors CC1/CC2 for Rd pull-down. Nothing else happens until this is detected.
- Source detects orientation based on which CC pin sees Rd.
- Source applies VBUS at 5V and VCONN to the unused CC line.
- Source and Sink exchange Source_Capabilities messages over the active CC line, advertising available voltage/current profiles.
- Sink requests a specific profile. Source accepts or rejects.
- Source transitions VBUS to the negotiated voltage. Sink monitors the transition and confirms.
Critical PD 3.1 Parameters
| Parameter | Standard Power Range (SPR) | Extended Power Range (EPR) |
|---|---|---|
| Max Voltage | 20V | 48V |
| Max Current | 5A | 5A |
| Max Power | 100W | 240W |
| Cable Requirement | 3A or 5A rated | 5A EPR-rated with e-marker |
Design implication: If your product targets 240W, you need an EPR-capable PD controller, a 5A-rated cable with an active e-marker, and a 24-pin connector. A 6-pin connector can theoretically negotiate EPR voltages, but the thermal and current density challenges at 48V/5A make 24-pin the practical minimum.
USB-C Connector PCB Layout Guidelines
Routing a USB-C connector is not like routing a barrel jack. The density and signal integrity requirements demand discipline.
For a complete step-by-step PCB layout guide with impedance control
requirements, see our USB-C PCB Layout Guide.
High-Speed Differential Pairs (TX/RX)
- Target impedance: 85–90Ω differential. Use a field solver if your stackup is non-standard.
- Length matching: Match within 5 mils (0.127 mm) for intra-pair, and 25 mils (0.635 mm) for inter-pair skew.
- Via minimization: Each via is a stub that degrades return loss. If vias are unavoidable, use back-drilling or place ground vias within 40 mils of each signal via.
- Ground stitching: Place ground vias around the connector perimeter to contain EMI and provide a low-impedance return path.
CC Pin Routing
- Pull-up/pull-down resistors: Place Rp (Source, typically 56 kΩ, 22 kΩ, or 10 kΩ depending on current advertisement) and Rd (Sink, 5.1 kΩ) as close to the connector as possible.
- ESD protection: CC pins are directly user-accessible. A low-capacitance TVS diode (e.g., <0.5 pF) is non-negotiable for robust designs.
- Trace length: Keep CC traces short. They carry BMC-encoded signals at ~300 kHz, but noise pickup causes PD negotiation failures that are invisible on a scope without a protocol analyzer.
VBUS and GBUS Routing
- Trace width: For 5A continuous, calculate width based on your copper weight and temperature rise. At 1 oz copper, a 5A trace with 10°C rise needs roughly 120 mils (3 mm). Use multiple parallel traces or pour polygons if space is tight.
- Decoupling: Place bulk capacitance (typically 10 µF) near the connector, but manage inrush current. The USB-IF spec limits inrush to no more than the equivalent of 10 µF directly on VBUS. Exceed this, and compliant sources may shut down.
- Thermal relief: Solder all four GND pins and the shell tabs to large copper pours. The connector shell is your primary heat dissipation path.
Shielding and Mechanical Integrity
- Shell grounding: The connector shell must connect to chassis ground through a low-impedance path. Do not float the shell.
- Through-hole anchors: For applications with high insertion cycle counts or cable strain, use receptacles with through-hole mounting tabs. SMT-only connectors lift under mechanical stress.
For a deeper dive into connector selection and mechanical considerations, see our Complete Design Guide for Choosing a USB-C Connector.
Common USB-C Design Mistakes (And How to Avoid Them)
After fifteen years in this industry, I have seen the same errors repeat across startups and Fortune 500s alike. Here are the ones that cost the most time and money.
Mistake 1: Ignoring CC Pins Entirely
The most common failure mode in DIY and low-cost designs. Engineers treat CC as “some configuration thing” and leave them floating. The result? The Source never detects the Sink. VBUS never turns on. The device never charges. CC pins are not optional. They are the prerequisite for every other function.
Mistake 2: Incorrect Differential Pair Routing
Routing TX/RX pairs at arbitrary angles, crossing splits in the ground plane, or ignoring impedance control produces signal integrity failures that manifest as intermittent USB 3.x disconnects. These are maddening to debug because the link trains successfully at USB 2.0 speeds and only fails under SuperSpeed load. Use a proper stackup, follow the 85–90Ω target, and simulate if possible.
Mistake 3: Poor Shield Grounding
A floating connector shell radiates EMI like an antenna. It also provides no ESD discharge path, so human-body model ESD events (8 kV contact, 15 kV air) arc directly into your signal traces. Ground the shell. Use a 1 MΩ resistor to chassis ground if you need DC isolation, but never leave it floating.
Mistake 4: Wrong Footprint Design
USB-C receptacles have multiple mechanical variants—mid-mount, top-mount, vertical, horizontal—each with a different PCB footprint. Using a generic footprint from a CAD library without verifying against the manufacturer’s datasheet leads to misaligned tongues, weak solder joints, and mechanical failure. Always download the official footprint from your connector supplier.
Mistake 5: Assuming All USB-C Cables Are Equal
A $2 cable from a discount marketplace may have the right connector shape and zero of the right internal wiring. For 5A/100W+ applications, demand cables with active e-markers. For USB 3.x/USB4, verify the cable supports the required data rate. A charging-only cable will physically plug into your high-speed port and silently throttle it to USB 2.0 speeds.
Practical Selection Framework: Which Pin Count Do You Actually Need?
Use this decision tree to cut through the noise:
Does your product transfer data at USB 3.x speeds or output video?
→ Yes → 24-pin full-featured. No exceptions.
→ No → Continue.
Does your product need USB 2.0 data (firmware updates, device enumeration, HID)?
→ Yes → 16-pin or 12-pin. Verify your MCU supports USB 2.0.
→ No → Continue.
Does your product need only USB PD charging with no data?
→ Yes → 6-pin. The lowest cost, lowest complexity option.
→ No → Re-evaluate your requirements.
Budget constraint forcing a downgrade from 24-pin?
→ Accept the loss of high-speed data and video. Do not attempt to “make it work” with a 16-pin connector and external PHY workarounds. The pinout is the pinout.
Ready to Source?
Get the Exact USB-C Connector Your Design Needs
Vistar Electronics stocks 24-pin, 16-pin, 12-pin, and 6-pin USB-C receptacles in multiple mounting configurations. Free datasheet and PCB footprint files included with every sample request.
USB-C Connector Pinout — Frequently Asked Questions
What is the difference between 24-pin and 16-pin USB-C?
A 24-pin USB-C connector includes all SuperSpeed TX/RX differential pairs (TX1+/−, TX2+/−, RX1+/−, RX2+/−) and SBU1/SBU2 pins, enabling USB 3.x high-speed data (up to 20 Gbps), USB4 (40 Gbps), and DisplayPort/HDMI Alt Mode. A 16-pin connector omits these pairs, leaving only VBUS, GND, CC1, CC2, D+, D−, and SBU — sufficient for USB 2.0 data (480 Mbps) and USB PD charging up to 100W, but incapable of high-speed data or video output.
What do CC1 and CC2 pins do in USB-C?
CC1 and CC2 (Configuration Channel) pins perform four functions simultaneously: (1) detect cable insertion and plug orientation — whichever CC pin sees the Rd pull-down tells the source which way the plug is facing; (2) define power roles between source and sink; (3) advertise current capability via pull-up resistor values before PD negotiation; and (4) carry all USB Power Delivery protocol messages as BMC-encoded signals at approximately 300 kHz. CC pins are mandatory — leaving them floating prevents VBUS from turning on.
Can a 6-pin USB-C connector support USB PD fast charging?
Yes. A 6-pin USB-C connector retains VBUS, GND, CC1, and CC2 — enough to perform full USB PD negotiation. With a compatible PD controller IC, a 6-pin port can negotiate up to 100W (20V/5A) or even 240W EPR (48V/5A). However, the 6-pin configuration has no D+/D− or TX/RX pairs, so it supports zero data transfer. It is a charging-only interface.
Does 16-pin USB-C support DisplayPort Alt Mode?
No. DisplayPort Alt Mode requires the SBU1/SBU2 pins (for the AUX channel) and the SuperSpeed TX/RX differential pairs (remapped as DisplayPort Main Link lanes). A 16-pin connector omits the TX/RX pairs entirely, making DisplayPort Alt Mode physically impossible. Only a 24-pin full-featured USB-C connector supports DisplayPort, HDMI, or Thunderbolt Alt Mode.
Which USB-C pin count do I need for USB4?
USB4 (40 Gbps) requires a full 24-pin USB-C connector. USB4 uses all four SuperSpeed differential pairs (TX1, TX2, RX1, RX2) in dual-lane mode, plus SBU1/SBU2 for sideband communication. Any lower pin count — 16-pin, 12-pin, or 6-pin — physically cannot carry USB4 signals.
What is VCONN in USB-C?
VCONN is not a receptacle pin — it exists only in the cable plug, repurposed from the unused CC pin (the one not carrying the active PD channel). VCONN delivers 5V at up to 1W to power e-marker chips inside active cables and other active cable electronics. For cables rated at 5A/100W or higher, an e-marker chip powered by VCONN is mandatory — passive cables without an e-marker are limited to 3A regardless of connector rating.
What is the correct PCB trace impedance for USB-C SuperSpeed pairs?
The target differential impedance for USB-C SuperSpeed TX/RX pairs (TX1+/−, TX2+/−, RX1+/−, RX2+/−) is 85–90Ω differential. Length matching within each pair should be within 5 mils (0.127 mm), and inter-pair skew should be within 25 mils (0.635 mm). Minimize vias — each via introduces a stub that degrades return loss at USB 3.x and USB4 frequencies.
What is the difference between 12-pin and 16-pin USB-C?
Functionally identical — both support USB 2.0 data and USB PD up to 100W, and neither supports SuperSpeed or Alt Mode. The difference is mechanical: a 16-pin connector has 16 individual solder pads including separate VBUS and GND pins, while a 12-pin connector internally combines some VBUS and GND contacts, reducing the solder joint count to 12. Choose 12-pin for simpler PCB assembly; choose 16-pin if you want individual power pin routing flexibility.
Conclusion
USB-C is not a single connector. It is a modular system where pin count dictates capability, cost, and complexity. The 24-pin full-featured receptacle remains the gold standard for high-speed data and video applications. The 16-pin and 12-pin variants dominate the cost-sensitive USB 2.0 + PD space. The 6-pin configuration proves that even the most minimal USB-C implementation retains the intelligence to negotiate serious power.
The engineers who master this pinout—who understand why CC pins matter, why TX/RX pairs need impedance control, and why a 6-pin connector can still deliver 100W—are the ones who ship products that work reliably in the field and survive the scrutiny of procurement teams.
Source USB-C Connectors Direct from Shenzhen
Vistar Electronics manufactures 24-pin, 16-pin, 12-pin, and 6-pin USB-C connectors in SMT vertical, mid-mount, right-angle, and IP67 waterproof configurations. ISO 9001:2015 certified. RoHS 3 & REACH compliant. MOQ 1,000 pcs.
- Free samples for qualified engineering projects
- Custom pin count and mounting type on request
- OEM/ODM available · 2–4 week lead time
- RoHS 3 declarations available for CE marking
Related Reading:
- What’s USB Type C Pinout Definition (24P 16P/12P 6P)?
- Why Is The USB-C Female Connector Pinout Like That?
- Complete Design Guide for Choosing a USB-C Connector
- USB Type C Connector Product Catalog
- USB C Receptacle: Reliable Power and Data Transfer
External References:
- USB Type-C Cable and Connector Specification R2.0 — USB-IF Official Specification
- USB-C Pinout In Depth: A Comprehensive Technical Guide for Engineers — Wevolver


